Learning skills from daily projects
Unscheduled update
| Capital Letters | Lowercase Letters | Description | Symbol / Character |
|---|---|---|---|
| Α | α | alpha | Α |
| Β | β | beta | Β |
| Γ | γ | gamma | Γ |
| Δ | δ | delta | Δ |
| Ε | ε | epsilon | Ε |
| Ζ | ζ | zeta | Ζ |
| Η | η | eta | Η |
| Θ | θ | theta | Θ |
| Ι | ι | iota | Ι |
| Κ | κ | kappa | Κ |
| Λ | λ | lambda | Λ |
| Μ | μ | mu | Μ |
| Ν | ν | nu | Ν |
| Ξ | ξ | xi | Ξ |
| Ο | ο | omicron | Ο |
| Π | π | pi | Π |
| Ρ | ρ | rho | Ρ |
| Σ | σ | sigma | Σ |
| Τ | τ | tau | Τ |
| Υ | υ | upsilon | Υ |
| Φ | φ | phi | Φ |
| Χ | χ | chi | Χ |
| Ψ | ψ | psi | Ψ |
| Ω | ω | omega | Ω |
- interrogation mark:
? - colon:
: - sharp:
# - dash:
- - (forward)slash:
/, back slash:\ - Parentheses or round brackets:
( ) - Curly or brace brackets:
{ } - Square or box brackets:
[ ] - Angle brackets:
< > - Single or double quotation:
"" '' - Tilde:
~ - Indentation:
\t
ctrl+shift+spaceshow function helpctrl+enterinsert a new line belowctrl+shift+enterinsert a new line above
| Lunar Lobster: 23 | Jammy Jellyfish 22 | Focal Fossa 20 | Bionic Beaver 18 | Xenial Xerus 16 | Trusty Tahr 14 |
- Ctrl+L: clear up to the beginning
- Ctrl+W: delete just a word
- Ctrl+C: cancel
- Ctrl+A: Go to beginning of the line
- Ctrl+E: Go to end of the line
- Ctrl+D:Stop current work(loop)
- Ctrl+Q: clear current cli input
- PATH: system package search path.
- PYTHONPATH: python package search path.
ls -alist all files (inclduing hidden ones)
unzip -n src_path -d dest_path-n: extract not existing.
When unzip a very large file(like 30+GB), use this to continue extracting in case of "not enough memory"
-d: dest path
zipinfo file_pathshow details of the zipfile and total number of zip sub files
find . -type f | wc -lshow total number of sub files
cp /path/to/source /path/to/dest/directory/copy file
wget -O dataset/fma_metadata.zip -nc https://os.unil.cloud.switch.ch/fma/fma_metadata.zip -O: directed dest, including file name -nc: not covering existing files
du -h --max-depth=1 ~/downloadshow the size of first level foulders
A good way to show google drive folder size in google colab
du -sh
df -h --total
show free space / total space
nohup <process> &
nohup <process> & > logger.log # logging
run command in the background
ps -ef | grep py_downloader.py
kill <PID>
stop that command
tmux new-session -s my_project
tmux -a
tmux kill-session -t mysession
new session, attach and kill session
ctrl+b DDetach current session, very useful for remote server.
ctrl+b [Enter copy mode. But it still kind of tricky to use.
diff [options] File1 File2-c: context -u: unified, same as -c except redundant lines -y: Short for "side-by-side"
mv oldname newname
mv olddir newdircat > filename1.txt
touch filename2.txt
mkdir folder
mkdir -p folder0/folder1/folder2rm filename
rm -r foldernamecontrol + R
sudo shutdown nowps auxtouch file1 file2 # create a file if not existing (-c to avoid creating), or change the timestamp to the current time if already existing
touch file_{1...10} # create files in batch
touch -t <timestamp> <filename> # set timestamp[[CC]YY]MMDDhhmm[.ss] or string(tomorrow | 19 August 2020 | Sunday)sudo systemctl start/status/restart servicechmod +x filename.sh # make a file executablewhich python # return python interpretor pathrealpath relative/path # return the absolute path- Download Ubuntu 22.04, because Ubuntu 20.04 has lots of questions from my experiences
- Use Rufus to create a USB medium installer, with GTP partition and NTFS format
- Go to UEFI/BIOS and start from USB
- install Ubuntu with three partitions
- EFI 500MB Primary Partition
- Swap 2*Memory Size but 32GB usually enough Logical Partition
- / just root directory rest of space Ext4 Logical Partition
- Install Applications
sudo apt updatesudo apt install build-essential vim
- Grub configuration
vim /etc/default/grub- set
GRUB_DEFAULT=savedandGRUB_SAVEDEFAULT=true sudo update-grub
- Fix time difference between Win and Linux in link
Thanks to the cheat sheet from hbons
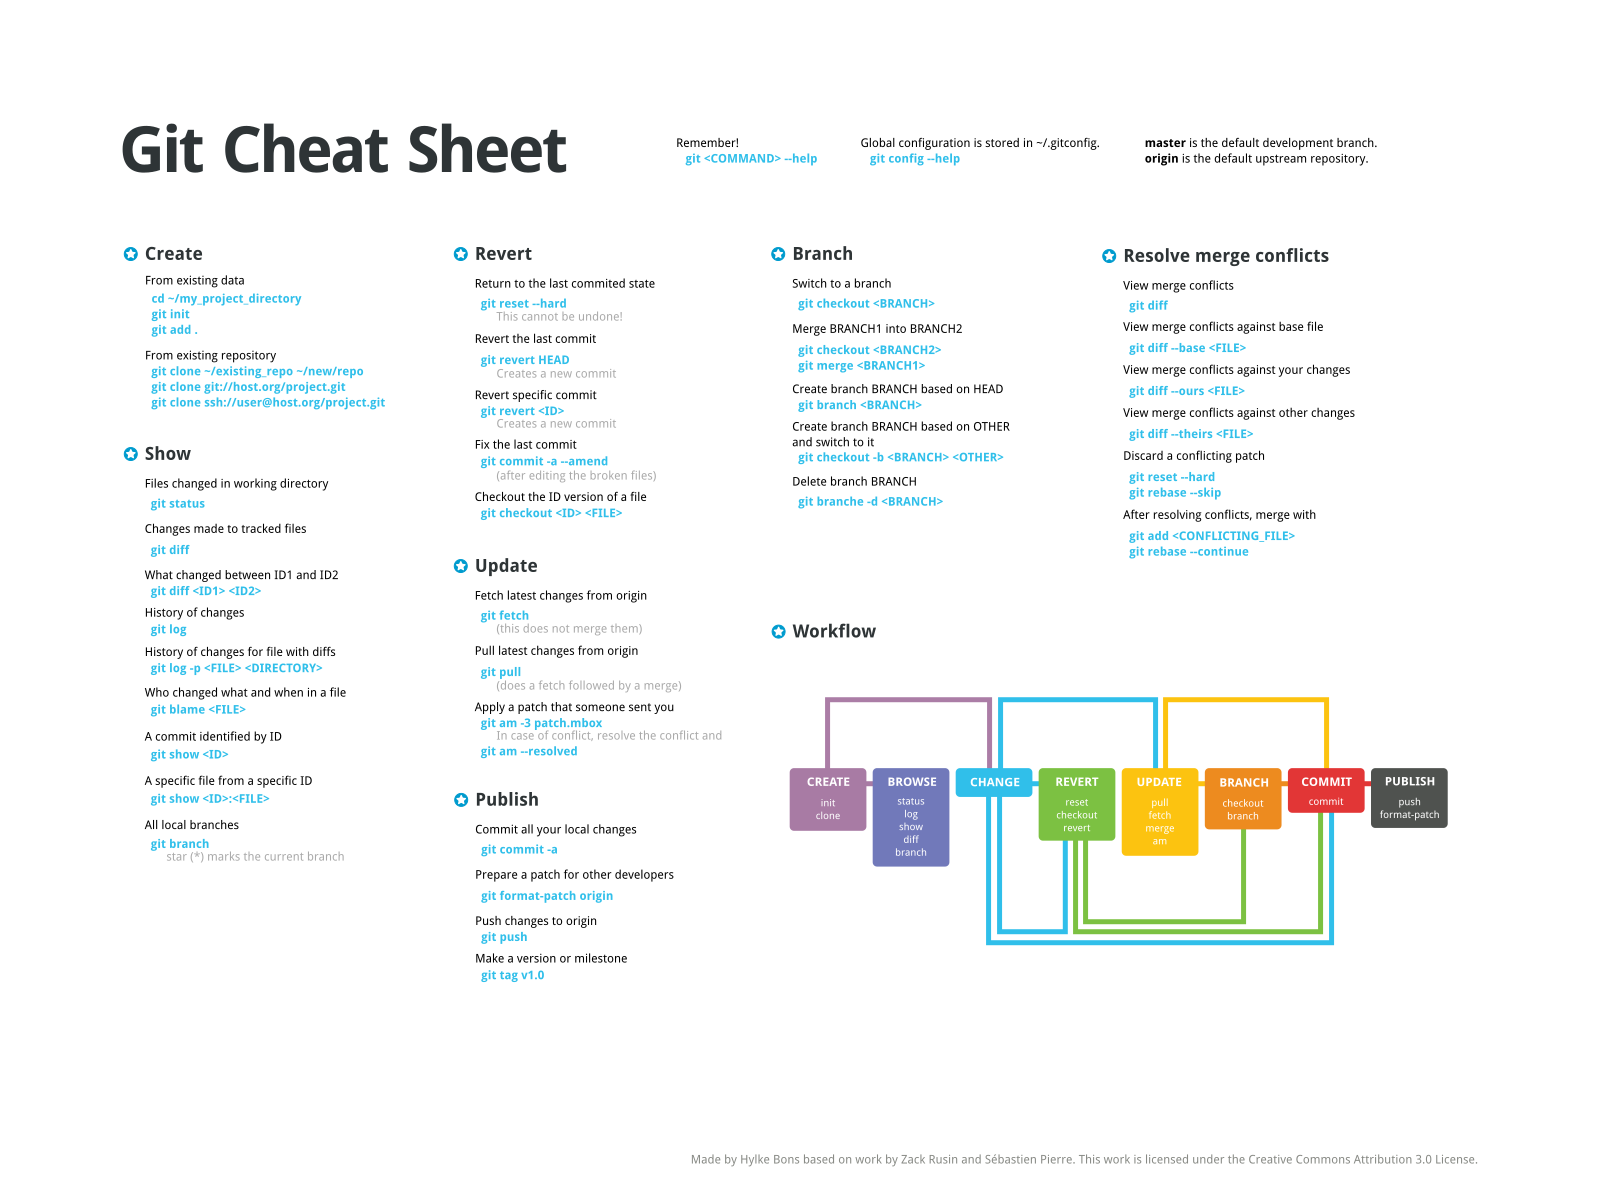
Thanks to the workflow from jdsalaro
git init
vim .gitignore    # create a file to avoid adding certain files into repo
git add -A        # or git add .
git commit -m "comment"
git remote add origin <url>
git push -u origin master     # or origin main, -u means tracking and creating remote branch if non-existing
convert a existing folder to a local repository
git remote add origin <git_url>
git branch -M main
git push -u origin maingit clone -b <url> # direct clone the specific branch
git push origin local_branch:remote_branchswitch to a remote branch
use git in a docker and get errors git vscode container error "Error: Cannot find module '/tmp/vscode-remote-containers-*'"
dd     # delete whole line
u :u # undocat /etc/issue # Ubuntu 20.04.6 LTS \n \l
cat /etc/os-release # NAME="Ubuntu" VERSION="20.04.6 LTS (Focal Fossa)" ...
hostnamectl # Static Machine ID Operating System Kernel Architecture
uname -a # Linux xxx 5.15.0-88-generic
cat /etc/debian_version # bullseye/sid
lsb_release -a # No LSB modules are available. Distributor ID: Ubuntu Description: Ubuntu 22.04.4 LTS Release: 22.04 Codename: jammy- link to google drive
from google.colab import drive
import os
root_path = "/content/drive/MyDrive/dest_path"
drive.mount('/content/drive')
os.chdir(root_path)
the bash commands below are now all under root_path
!ls
!pwd
!git clone
pip show numpy
# or
pip list | grep numpy
show package numpy version
pip config listshow pip source
pip install -r requirements.txtpip config set global.index-url https://pypi.tuna.tsinghua.edu.cn/simple
# Pip source
# mk ''
# [global]
# index-url = https://mirrors.aliyun.com/pypi/simple/
#
# [install]
# trusted-host=mirrors.aliyun.comlist(set(A)-set(B))unduplicate list A - unduplicate list B
from multiprocessing import Pool
from itertools import repeat
p = Pool(8)
p.starmap(func, zip(arg_list, repeat(single_arg)))
multithread pool executes multi-arguments function
isinstance(s, str)check if s is a string or int etc.
from typing import List, Tuple, Dictindicate data type
def function(param_a: str, param_b: np.array) -> dicta = list()
a.append(element) # add single element to the end
a.extend(iterable) # add iterable(multi elements) to the end
a.insert(index, element) # add single element to the specified positionvalue = my_dict.setdefault('c', 3)if my_dict['c'] exists, get its value. If not, set it as 3.
(1,2,3) + (3,4,5) = (1,2,3,3,4,5)tuples can add but their elements are unchangable.
input *args, and arg will be a tuple
input **kargs, which should be (karg_1=1, karg_2=2...), and karg will be a dictionary {karg_1: 1, karg_2: 2...}>>> print('I want to learn %s. How about you?' %'Python')
I want to learn Python. How about you?
>>> print('10 - 23 is %d, not %u' %(-13, 13) )
10 - 23 is -13, not 13
print("{} {}".format("hello", "world")) # No position assignment, deault
'hello world'
txt = "I have {an:.2f} Rupees!"
print(txt.format(an = 4))
print("{1} {0} {1}".format("hello", "world") ) # assigned position
'world hello world'
print(f"mean_reward: {mean_reward:.2f} +/- {std_reward:.2f}")
print("\033[91mHello World!\033[0m") # prints "Hello World!" in red colorfrom . import module_name # same director
from .package_name import module_name # same director
from .. import module name # upper director
from ..package_name import module_name # upper directorexport PYTHONPATH=/path/to/directory:$PYTHONPATHclass A (B):
def __init___ ():
super().__init()__
super().func_of_parent()from tqdm import tqdm
for iter in tqdm(iterative)as wrapper
# Template
with tqdm(total=args.max_train_steps, desc='PPO Trainning', leave=True, ncols=80, unit='steps', unit_scale=True, colour="red") as pbar:
  Iteration
  pbar.update(n)
Where, desc('str'): prefix description of the bar, mininterval/maxinterval(float): min/max updating time, miniters(int/float): min mode, ascii(bool/str): True(ASCII) False(unicode), ncols(int): bar width, nrows(int): , dynamic_ncols(bool): auto mode, smoothing(float): smooth bar updation, bar_format(str): to customize, position(int): bar position, colour(str): bar color
tqdm.write()display string above the bar.
assert a == 9 , 'a must be 9'if a != 9 then assert exception of 'a must be 9'
# os.system()
import os
command = "ls"
a = os.system(command)
# a = 0 if it runs well

# save IP address
# os.popen()  execute the cmd and get the output
import os
cmd = 'hostname -I'
result = os.popen(cmd)
ip_addr = result.readlines()[0].replace(' ','').replace('\n','')
print(ip_addr)
files = os.listdir(directory_path) # equal to bash lsimport sys
sys.executableget the current python interpretor path
sys.path.append(parent_dir)add a path for python module search, equal to export PYTHONPATH=$PYTHONPATH:/path/to/dir
regular expression
The dir() function returns all properties and methods of the specified object, without the values.
but firstly returns the __dir__ if the target has
a = np.array([[1,2,3],[4,5,6],[7,8,9]])
# a[0] return np.ndarray [1,2,3], shape=(3,)
# a[0:1] return np.ndarray [[1,2,3]], shape=(1,3)
Slice to array or vector
np.tile( A,(2,2) )
# A -> [A A]
# [A A]np.concatenate((A,B),axis=0)connect Matrix A and B
import numpy as np
a = np.random.random(3)
print('before set precision: \n',a)

np.set_printoptions(precision=3, suppress=True)
print('after set precision: \n',a)

np.set_printoptions(formatter={'float': '{: 0.3f}'.format})
print('after set formatter: \n',a

# output
# before set options:
# [ 0.05856348 0.5400039 0.70000603]
# after set precision:
# [ 0.059 0.54 0.7]
# after set formatter:
# [ 0.059 0.540 0.700]
print with precision and point
a = np.random.random((3,4))
b = a >= 0.5
print(a[b[:,0], : ])    # b[:,0] is a vector (3,), it works
print(a[b[:,0:1],:])    # b[:,0:1] is a matrix (3,1), it fails
# when b[:,0] is all False, result will be []
slides and index
opencv uses numpy as data framework or discriber.
OpenCV imread, imwrite and imshow indeed all work with the BGR order, so there is no need to change the order when you read an image with cv2.imread and then want to show it with cv2.imshow.
While BGR is used consistently throughout OpenCV, most other image processing libraries use the RGB ordering. If you want to use matplotlib's imshow but read the image with OpenCV, you would need to convert from BGR to RGB.
cv2.cvtColor(img, cv2.COLOR_BGR2RGB)convert img in opencv from bgr to rgb.
print("Num GPUs Available: ", len(tf.config.list_physical_devices('GPU')))check GPU condition
loc: location parameter, in most cases is 'Mean'
# tf.where mode1: return the indexes of non-zero elements
tf.where()

# tf.where mode2:
tf.where([True, False, False, True],          # Bool
...          [1, 2, 3, 4],                    # values replace True
...          [100, 200, 300, 400]).numpy()    # values replace False
# >>> array([  1, 200, 300,   4], dtype=int32)
tf.where
tensorflow.Sequence
np.save(... , allow_tickle=True)
np.load(... , allow_tickle=True)
to handle the error of "allow_tickle=False" or "raise pickle.UnpicklingError" in tesorflow.Sequence
tf.broadcast_to(A,B.shape)
tf.boolean_mask(Tensor, Mask)
tf.reshape(tensor, shape, name=None)
tensor tools
EinSum [https://rockt.github.io/2018/04/30/einsum]
data_batch = dataset.batch(1)    # divide the dataset into batches of size 1
data_iter = iter(data_batch)     # returns an iterator from an iterable object
data_next = next(data_iter)      # returns the next item from the iterator. Here it fetches the very first iteration
data_infer = model(data_next)    # infer with the model

_, _ = model(next(iter(dataset.batch(1))), training=False) # used to initialized the model inference with the firt iterOn the remote machine, start TensorBoard on a known port, e.g. 6006:
tensorboard --logdir /path/to/logs --port 6006 --host 0.0.0.0On your local machine, create an SSH tunnel:
ssh -L 6006:localhost:6006 username@remote_serverThen open locally, visit:
http://localhost:6006fig, ax = plt.subplots() # fig, axs = plt.subplots(m,n) -> axs[m-1,n-1]
ax.plot(x, A @ theta, label='Estimation', color='red')
ax.scatter(x, y, label='Observation', color='blue', marker='x')
ax.legend()
plt.show()plt.show() will display the current figure that you are working on.
plt.draw() will re-draw the figure. This allows you to work in interactive mode and, should you have changed your data or formatting, allow the graph itself to change.
Subplots and title
fig = plt.figure(figsize=(10,10))                  # figure size
ax1 = fig.add_subplot(2,2,1, projection='3d')      # subplot
# other subplot ...
ax1.axes.set_zlim3d(1,4)                           # axis limit
ax1.set_zlabel('Depth-axis')                       # axis label
# other axis ...
ax1.view_init(elev=-60, azim=-90)                  # veiw position
ax1.set_title('Front View', fontstyle='italic')    # subplot title
ax1.legend()
# other axis ...
sc1 = ax1.scatter(0, 0, 0, color='r', label='Kalman + Inlier')                                   # scatter init with color and label
sc1._offsets3d = (-scatter_mat_Kalman[:,0], scatter_mat_Kalman[:,1], scatter_mat_Kalman[:,2])    # scatter update in for loop, ._offsets3d is the inner attribute not the method
dynamic scatter
source virtual_env_path/bin/activate
deactivate
activate & deactivate
https://github.com/microsoft/pylance-release/blob/main/TROUBLESHOOTING.md#unresolved-import-warnings
poetry init
poetry install
poetry shell
poetry add <dependency>
poetry lock # update poetry.lockconda info
conda info -e
# sudo chmod 600 PATH
conda create -n <env name> python=x.x
conda create --prefix=/var/www/myblog/felixvenv python=3.7.1
conda remove -n <env name>
conda remove --name ENV_NAME --all
conda update --allshow env information
show all envs
create a virtual env
conda install --yes --file requirements.txtconda install packages in requirement.txt
ssh-keygen -m PEM -t rsa -b 4096When lose connection in a public network, the reason might be the "wireless mode". Try to modify the "wireless mode" to 'IEEE 802.11 b/g'
# configuration
Host Alias/Abbreviation
  HostName <xxx.xxx.xxx.xxx>
  User <username>
  Port 22
IdentityFile <C:\Users\username\.ssh\xxx.pem>scp ./filename username@ip-address:~/path/to/put/it/ # upload to robot
scp username@ip-address:/path/to/filename ~/path/to/put/it/ # download from robotUpload or Download files
gcloud auth login
gcloud init
gcloud compute ssh --project=PROJECT_ID --zone=ZONE VM_NAME # direct ssh connect via Putty
gcloud compute config-ssh # generate ssh config in your .ssh folderUbuntu
# apt source (Raspberry Debian10 Buster)
# /etc/apt/sources.list
deb http://mirrors.tuna.tsinghua.edu.cn/raspbian/raspbian/ buster main non-free contrib rpi
deb-src http://mirrors.tuna.tsinghua.edu.cn/raspbian/raspbian/ buster main non-free contrib rpi
# /etc/apt/sources.list.d/raspi.list
deb http://mirrors.tuna.tsinghua.edu.cn/raspberrypi/ buster main ui
Python in Ubuntu
# Pip source
# mk ''
# [global]
# index-url = https://mirrors.aliyun.com/pypi/simple/
#
# [install]
# trusted-host=mirrors.aliyun.com
Conda in Win
# Tsinghua source for China Mainland
conda config --add channels https://mirrors.tuna.tsinghua.edu.cn/anaconda/pkgs/free/
conda config --add channels https://mirrors.tuna.tsinghua.edu.cn/anaconda/cloud/conda-forge
conda config --add channels https://mirrors.tuna.tsinghua.edu.cn/anaconda/cloud/msys2/
# show
conda config --set show_channel_urls yes
# reset
conda config --remove-key channels
source /opt/ros/humble/setup.bash
echo "source /opt/ros/humble/setup.bash" >> ~/.bashrc    # add source to .bashrc

ros2 pkg create --build-type ament_cmake --license Apache-2.0 <package_name> # create a packageros2 run <package_name> <executable_name> # ros2 run turtlesim turtlesim_noderos2 node list
ros2 node info <node_name>
ros2 param list # show parameters in node namespaces
ros2 param get <node_name> <parameter_name>
ros2 param set <node_name> <parameter_name> <value>
ros2 param dump <node_name> > node_param.yaml # View all of a node’s current parameter values and save to file
ros2 param load <node_name> <parameter_file> # load param from file
ros2 run <package_name> <executable_name> --ros-args --params-file <file_name>ros2 topic echo <topic_name> # To see the data being published on a topic
ros2 topic info <topic_name> # Type, Publisher/Subscriber count
ros2 interface show <msg type> # to learn Type details
ros2 topic pub <topic_name> <msg_type> '<args>' # ros2 topic pub --once /turtle1/cmd_vel geometry_msgs/msg/Twist "{linear: {x: 2.0, y: 0.0, z: 0.0}, angular: {x: 0.0, y: 0.0, z: 1.8}}"ros2 service list -t # -t=--show-types, show services and their types
ros2 service type <service_name> # To find out the type of a service, service type like "std_srvs/srv/Empty
ros2 service find <type_name> # To see the request and response arguments of the service type
ros2 service call <service_name> <service_type> <arguments>ros2 launch turtlesim multisim.launch.pyBut ROS 2 launch formats in Using Python, XML, and YAML for ROS 2 Launch Files.
# turtlesim/launch/multisim.launch.py

from launch import LaunchDescription
import launch_ros.actions

def generate_launch_description():
    return LaunchDescription([
        launch_ros.actions.Node(
            namespace= "turtlesim1", package='turtlesim', executable='turtlesim_node', output='screen'),
        launch_ros.actions.Node(
            namespace= "turtlesim2", package='turtlesim', executable='turtlesim_node', output='screen'),
    ])
ros2 bag record <topic_name>
ros2 bag record -o subset /turtle1/cmd_vel /turtle1/pose # -o indicates the save bagfile
ros2 bag info <bag_file_name>
ros2 bag play <bag_file_name>
ros2 topic hz /turtle1/pose # topic frequencyDifferent from catkin build, the ROS2 use colcon build
colcon build --symlink-install # colcon supports the option --symlink-install. This allows the installed files to be changed by changing the files in the source space CMakeLists.txtfile that describes how to build the code within the packageinclude/<package_name>directory containing the public headers for the packagepackage.xmlfile containing meta information about the packagesrcdirectory containing the source code for the package
- Substitution Attribute:
${} - Substitution Function:
$()
- Nodes: A node is an executable that uses ROS to communicate with other nodes.
- Messages: ROS data type used when subscribing or publishing to a topic.
- Topics: Nodes can publish messages to a topic as well as subscribe to a topic to receive messages.
- Master: Name service for ROS (i.e. helps nodes find each other)
- rosout: ROS equivalent of stdout/stderr
- roscore: Master + rosout + parameter server (parameter server will be introduced later)
- rosservice: Services are another way that nodes can communicate with each other. Services allow nodes to send a request and receive a response.
- rosparam: rosparam allows you to store and manipulate data on the ROS Parameter Server.
- msg: msg files are simple text files that describe the fields of a ROS message. They are used to generate source code for messages in different languages.
- srv: an srv file describes a service. It is composed of two parts: a request and a response.
catkin_create_pkg <package_name> [depend1] [depend2] [depend3]
rospack depends1 beginner_tutorialsrosnode list
rosndoe info /rosrunRun the node from the package
rosrun [package_name] [node_name] __name:=[customed name]rostopic bw display bandwidth used by topic
rostopic echo print messages to screen
rostopic hz display publishing rate of topic
rostopic list print information about active topics
rostopic pub publish data to topic
rostopic type print topic type
rostopic list -v, --verbose list full details about each topic
$ rostopic type /turtle1/command_velocity
> turtlesim/Velocity
$ rosmsg show turtlesim/Velocity
float32 linear
float32 angular
rostopic pub [topic] [msg_type] [args]
$ rostopic pub -1 /turtle1/cmd_vel geometry_msgs/Twist -- '[2.0, 0.0, 0.0]' '[0.0, 0.0, 1.8]'Plot topics
rosrun rqt_plot rqt_plotrosservice list print information about active services
rosservice call call the service with the provided args
rosservice type print service type
rosservice find find services by service type
rosservice uri print service ROSRPC uri
rosservice call [service] [args]rosparam set set parameter
rosparam get get parameter
rosparam load load parameters from file
rosparam dump dump parameters to file
rosparam delete delete parameter
rosparam list list parameter names
rosparam set [param_name] # rosparam set /turtlesim/background_r 150
rosparam get [param_name]
rosparam get / # get all params
rosparam dump [file_name] [namespace]
rosparam load [file_name] [namespace]roscd rospackage
mkdir srv msg
# ceate .msg and .srv like
Header header
string child_frame_id
geometry_msgs/PoseWithCovariance pose
geometry_msgs/TwistWithCovariance twist
---
int64 sum # response only exists in srv
# check them
rosmsg show [message type]
rossrv show <service type>Modify package.xml and CMakelists.txt with the link [http://wiki.ros.org/ROS/Tutorials/CreatingMsgAndSrv]
roscd rospackage
mkdir scripts
Add codes and modify CMakelists.txt like [http://wiki.ros.org/ROS/Tutorials/WritingPublisherSubscriber%28python%29], then test
cd ~/catkin_ws
catkin_make
rosrun beginner_tutorials talker.py
rosrun beginner_tutorials listener.pyFollow the link[http://wiki.ros.org/ROS/Tutorials/WritingServiceClient%28python%29], then test with
rosrun beginner_tutorials add_two_ints_server.py
rosrun beginner_tutorials add_two_ints_client.py 1 3mkdir ~/bagfiles
cd ~/bagfiles
rosbag record -a # record all topics
rosbag record [TOPIC1 TOPIC2 TOPIC3 ...]
rosbag play
rosbag infoAll rosbag link[http://wiki.ros.org/rosbag/Tutorials]
# run and record
roscore
roslaunch
rosbag record -O <output_name> /turtle1/cmd_vel /turtle1/pose --duration 1m # record selected topics for 1 minute into name.bag
roslaunch realsense2_camera rs_camera.launch align_depth:=true
run ros script and record topics
The ros_numpy in ROS-noetic is too old to match the new Python and Numpy
try:
    import ros_numpy
except AttributeError:
    import numpy as np
    np.float = np.float64  # temp fix for following import
import ros_numpygo to ros_numpy and replace collections with collections.abc
-
- vs. &
int var = 3000;
int *ptr;        // type * to define variable
int val;
ptr = &var;      // operator & to get the address
val = *ptr;      // operator * to get the value

// Declaration
void fun1 (int& n1, int& n2)    // type & to define reference. Reference is an alias. We use this to direct modify the arguement from upper function
{
  int temp = n1;                // variable n1 is an alias
  n1 = n2; n2 = temp;
}

void fun2 (int* n1, int* n2)    // type * to define pointer
{
  int temp = *n1;               // operator * to get the value
  *n1 = *n2; *n2 = temp;
}
zsh-completions: best auto completion plugin